
Start Slotbound by building a small army that can survive the next battle, then use spare summons to strengthen the units you want to keep. Matching slot symbols creates units; absorption develops them. The important decision is often what to keep after a spin, rather than whether to spin again.
This Slotbound beginner guide covers the full-release game on Steam. It is written from official descriptions, developer updates and cited reference data, rather than a claimed personal clear. Some store screenshots show earlier builds. Follow the names and requirements in your installed version if its interface differs.
Understand the three decisions in each wave
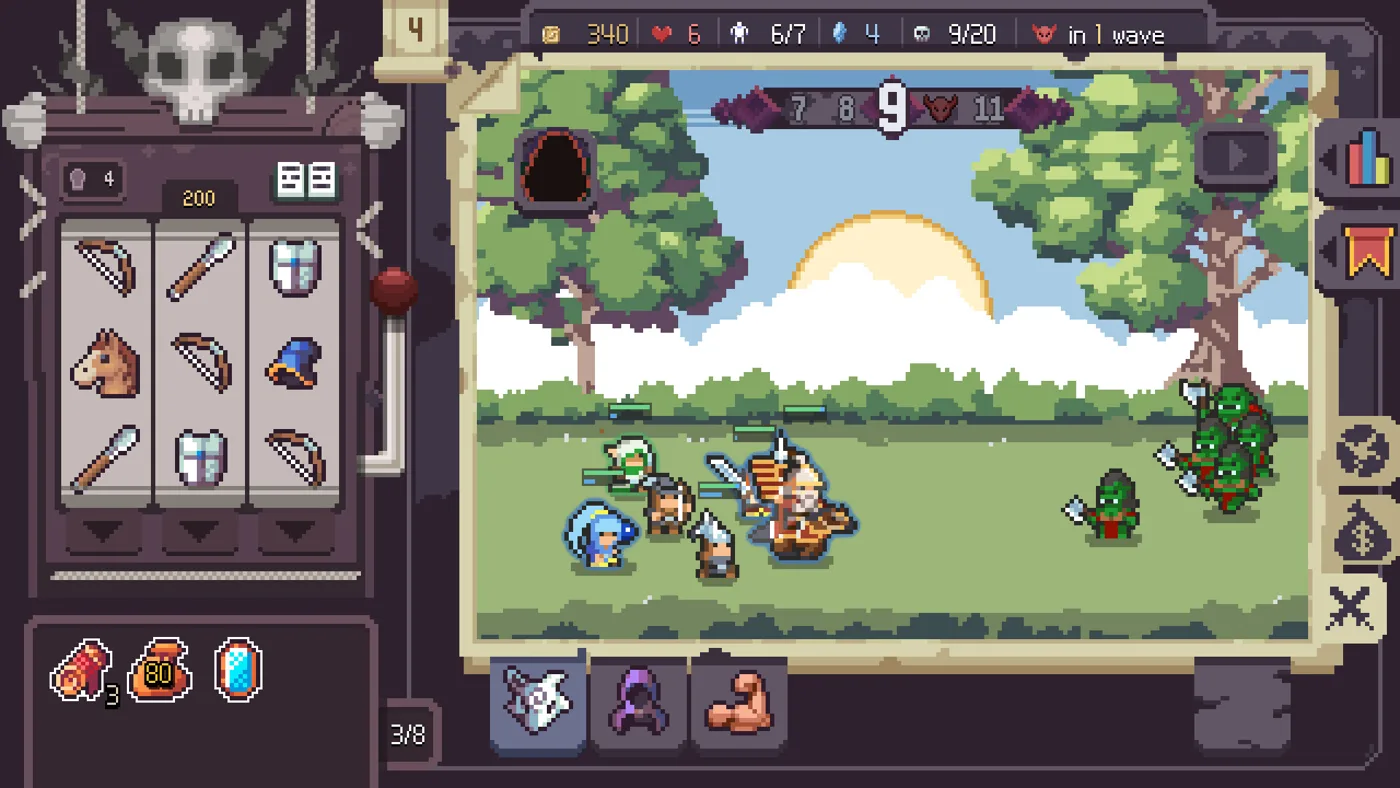
The slot machine, army and battle are connected, but they ask different questions. At the machine, you spend resources for a chance to summon. On the battlefield, you decide which summons should remain separate and which should become absorption material. In combat, you observe whether the resulting army actually handles the enemies.
Pause after each part of the loop. Spinning several times without looking at the army can leave you over capacity or with useful material assigned to the wrong receiver. Absorbing immediately after every win can remove the extra body that was keeping a fragile ranged unit alive. Watching only whether you won misses the difference between a comfortable clear and a near-loss that needs attention.
An ordinary preparation cycle is:
- Read the next wave and check your current army.
- Identify one weakness you want the next summon or purchase to address.
- Spin if the expected help is worth the displayed price.
- Inspect the new unit before treating it as material.
- Resolve capacity, promotions and imprint choices.
- Start the battle and watch what fails first.
The developer removed the preparation countdown in demo v0.2.0. You do not need to make an absorption decision in a panic because an old video shows a timer. That history matters: many early guides were written around an interface that has since changed.
Read the board before buying another spin
Slotbound uses a three-by-three board. Matching lines summon units, and the official description emphasizes that luck, unit development, Items and Cores all contribute to a run. A matching symbol is the beginning of a decision, not a complete build by itself.
Do not confuse a symbol family with a particular promoted class. A Warrior symbol and a specific Warrior-class unit are related, but grade and promotion determine what that unit can become. Similarly, a three-star unit is not automatically the same thing as a higher-rarity unit. These are different labels serving different purposes.
When comparing two units, inspect their names, grade, star level, Absorb LV, current imprints and traits. Looking only at the portrait is a poor way to choose a receiver. The unit directory gives you a small set of starter references and their promotion branches, with the source and snapshot date visible.
Keep an army, then develop a carry
For a new player, a useful starting question is: which unit can keep fighting, and which unit can deal damage while it does? That is a role check, not a demand for one fixed combination. You cannot assume that the next few spins will give you a particular Rare unit.
Consider an illustrative board with a Warrior, an Archer and another Warrior. You could feed the duplicate into a preferred receiver. Before doing so, ask whether the first Warrior is already surviving the wave and whether the second is giving the Archer time to attack. If the front line is collapsing immediately, reducing the army to make one damage number larger may solve the wrong problem.
On a different board, three similar unpromoted melee units might be competing for the same job while a ranged unit is doing most of the useful work. Consolidation could then make more sense. The point of these examples is the decision process; they are not tested winning line-ups or an exact simulation of enemy targeting.
After a loss, name what happened in plain language. “The ranged unit died before doing useful damage” is actionable. “My team is bad” is not. Useful observations include an army that cannot finish one durable enemy, a carry that cannot survive long enough to ramp, or a group that clears small enemies but struggles at a boss. Each suggests a different adjustment.
Absorb deliberately
Absorption consumes one unit to develop another. Decide which unit should survive before dragging anything. The developer added a manual unit lock specifically to prevent important units from becoming absorption material. Use it on a unit you intend to keep, then inspect the receiver after each unfamiliar merge.
The default keyboard shortcut for Absorb Mode is A, according to the official v0.3.0 update. The action is a mode toggle, so pressing it is not the same as selecting the intended receiver. If a drag does nothing, check the mode, lock state and whether a battle is currently running before repeatedly trying the same movement.
Absorption also connects to imprints. A useful new imprint and a higher level of an existing imprint are different benefits. Before confirming a replacement, read what the receiver would lose. An army that relies on one particular effect can become worse even while its Absorb LV increases.
Our absorption guide walks through the operation, locking and the common donor-versus-receiver mistake. Read that before experimenting with bulk absorption on a board you care about.
Spend on the problem in front of you
The next purchase should have a job. Extra damage is useful if your army survives but cannot finish enemies. It is less useful if the intended damage dealer is removed almost immediately. A Core that changes reel manipulation needs you to understand and use its trigger; an economy effect needs enough remaining opportunities to pay back its value.
Write a short reason in your head before taking an upgrade: “This helps my surviving attacker finish the boss,” or “This supports the machine action I am already using.” If the reason is only that the option is a higher rarity, read it again. Rarity alone does not tell you whether the effect fits the current board.
Avoid committing all your resources to a hypothetical future unit. A build from a video may depend on unlocked content, a particular Core and an unusually early pull. Start with the part you actually own. The build guide explains how to read a completed run without mistaking its final army for a guaranteed opening.
Progression changed after launch
On the v1.0.0 (9) rules covered here, Rare-unit access is tied to Stage 2 on Normal. Older instructions pointing you at Stage 3 on Easy are outdated. The same patch made Core Rate-Up available earlier and added some upgrade-currency rewards to defeated runs.
That does not make a defeat equivalent to a clear. Check the result screen for the currency actually awarded and the upgrade tree for what is now available. Choose a reachable unlock as your next objective rather than assuming a failed attempt has unlocked every system shown in a late-game video.
If Rare units are your immediate goal, use the Rare unlock checklist. If the next unlock is Core Rate-Up, use the exact prerequisites on the Cores page. Keeping those tasks separate makes it easier to see which requirement is still unmet.
Before your first boss
Spend a moment on the actual army rather than its total rarity. Check that your important unit is still present, that its imprints are the ones you intended, and that a pending promotion has been resolved. Open the Collection if you need to compare a class: v1.0.0 (8) added access during a run, including during promotion selection.
Do not begin a new absorption experiment immediately before a decisive fight unless you understand the result. If the current army is failing, make a targeted change. If it is performing well, a completely new structure may introduce more uncertainty than the extra stats justify.
The boss guide explains the distinction between judgement checkpoints and boss waves, with Open Forest as a concrete reference. It also gives you a way to review a failed attempt without declaring one unit universally weak.
Questions new players actually encounter
The reels shake and will not spin. Is the run broken? Army capacity was the accepted explanation in a Steam player thread about this symptom. Check capacity, remaining resources and unresolved choices before restarting. The not-spinning checklist separates those causes.
Can I stop in the middle of a run? Mid-run saving was added in the official v0.3.0 update. Use the game’s normal exit and continue options, and verify the resumed state before relying on it for a valuable run. See controls and saving.
Do I need a Legendary to start learning? No particular Legendary is required to learn the preparation, absorption and promotion loop. A video with an extraordinary pull demonstrates what that run obtained; it does not establish a requirement for every player.
Sources and version notes
The basic loop comes from the official Steam description. Preparation timing is documented in v0.2.0; locking, shortcuts and saving in v0.3.0. Current unlock changes are tracked in our patch notes. The example decisions above are editorial explanations, not claims of first-hand clears.
Look up a unit · Plan a build · Check the latest covered patch
Evidence-based editorial guidance. We have not independently play-tested these builds. How we check and update this guide.